

How To Add Water Animation To Water In Image Javascript
In this tutorial, nosotros're going to show you how to create a water ripple effect from scratch using JavaScript and Pixi.js library in only a couple minutes! Let's cheque it out! (Total Source code at the end of this mail)
Create a Scene
Pixi.js is 2D WebGL javascript library that let you create lots of stunning result easily with merely a few lines of code.

First allow's offset with download the latest version of pixi.js and include it to your page.
<script src="pixi.min.js"></script>
And here is the case folio. The CSS we need for this tutorial is margin:0 and overflow: hidden.
body { margin: 0; overflow: hidden; } At present allow'south offset with initializing pixi.js. Start we need to create an application.
Awarding object has necessary components to render your scene similar renderer, root container and time tracking. This is fastest way to starting time using Pixi.js unless yous want to manually create them 1 past 1. I'm going to supply, our current viewport width and meridian every bit the size. Then add the scene to our HTML page as canvas chemical element using app.view
app = new PIXI.Application({width: window.innerWidth, meridian: window.innerHeight}); document.body.appendChild(app.view); And next nosotros'll kickoff with adding this epitome to the scene. Using background image with diffraction calorie-free effect similar this will help it looks more realistic.
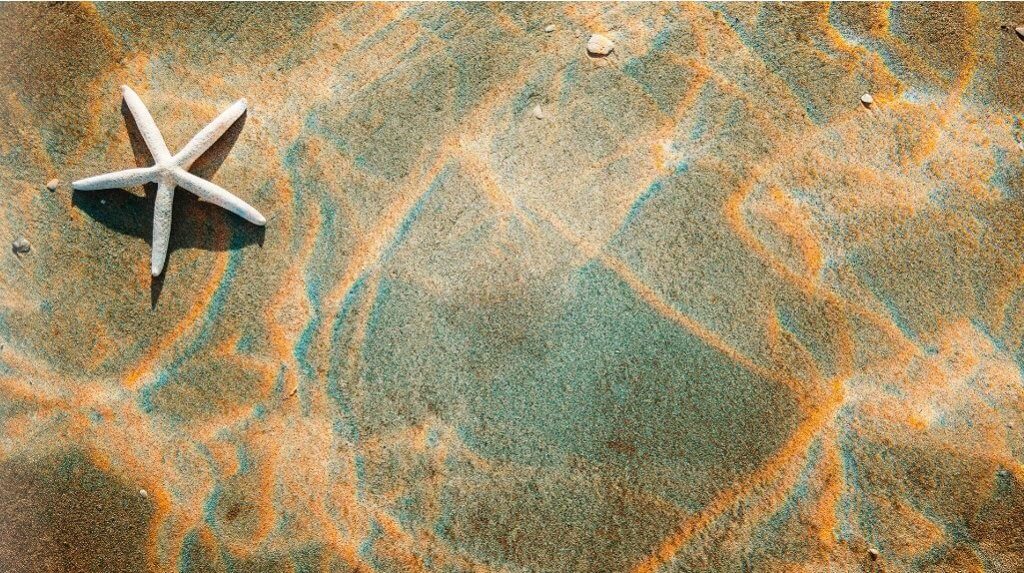
Kickoff permit's create a sprite from a jpg paradigm. And then prepare the width and height. And and then add it to the stage
var epitome = new PIXI.Sprite.from("water.jpg"); epitome.width = window.innerWidth; paradigm.height = window.innerHeight; app.stage.addChild(image); Deportation Map
Now to create the ripple upshot, we need to move the paradigm pixels away from their original position to create a distortion. With pixi.js this tin be done with displacement map. Basically, you only create a random variation of black and white design and use information technology to map with the original prototype. For tutorial, I'yard going to use Photoshop.
Starting time create a new square image, Then use render filter and select cloud. And that's it that's all you lot need.
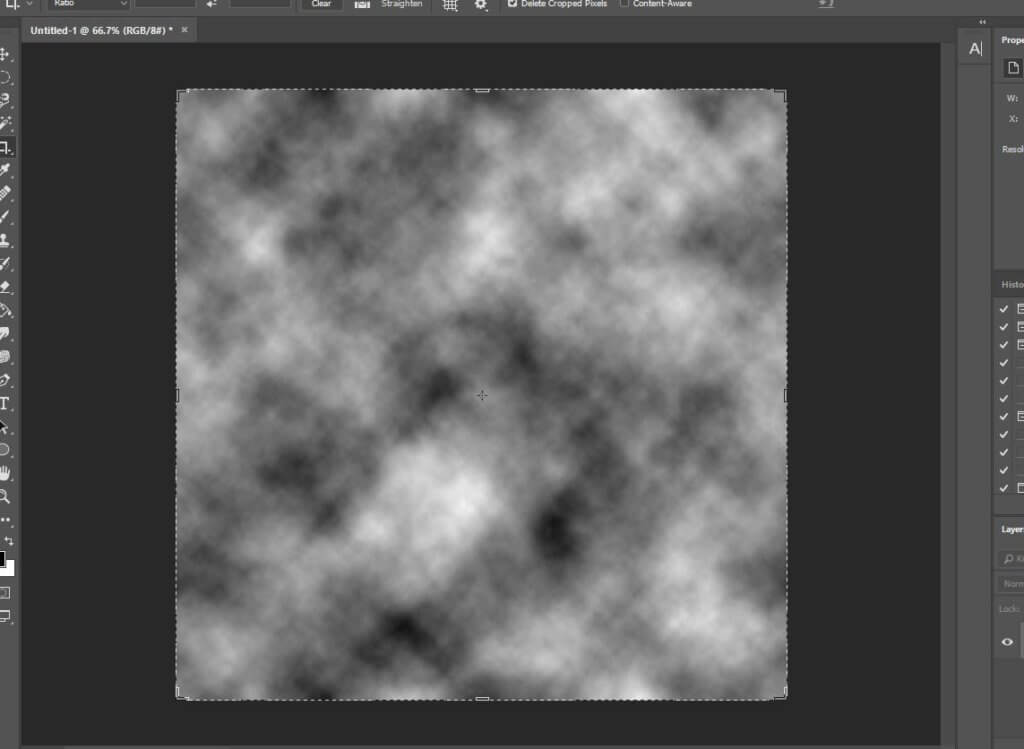
Now I'm going to create a sprite from this prototype. And then create a displacement filter from the sprite. We need to gear up the wrapMode to repeat to make sure the displacement cover the entire image. Then add it to the stage and utilize the filter.
displacementSprite = new PIXI.Sprite.from("cloud.jpg"); displacementFilter = new PIXI.filters.DisplacementFilter(displacementSprite); displacementSprite.texture.baseTexture.wrapMode = PIXI.WRAP_MODES.REPEAT; app.stage.addChild(displacementSprite); app.stage.filters = [displacementFilter]; The Animation
At this point everything is ready but all the same, you won't see much of the difference. We need to create an animation to move the displacement map to be able to come across the ripple issue.
Let'south create animate function and motion the displacement map. At the stop of the function, we'll phone call requestAnimationFrame to start the animation loop.
function breathing() { displacementSprite.x += 10; displacementSprite.y += 4; requestAnimationFrame(breathing); } Many of you might terminate at this point, but if you look a footling closer, yous will see a distortion around the edge. This is normal because we don't have any pixel beyond that. Nosotros can fix it past zooming in a little bit. Just apply the transform scale to the renderer.
displacementSprite.scale.x = 4; displacementSprite.scale.y = 4;
Also, I think the ripple is a fleck also dense. So I'one thousand going to calibration the displacement map besides.
app.renderer.view.fashion.transform = 'scale(1.02)';
You tin can effort alter and experiment with different displacement map to create diverse ripple result. Run across the final outcome in the video below.
And that's information technology. Just a chip over twenty lines of code for this tutorial. Hope you guys enjoy. Also don't forget to like or subscribe to our Facebook and Youtube Aqueduct to stay connected with us. See you lot next time!
Source Code
HTML
<!DOCTYPE html> <html> <head> <meta charset="UTF-8" /> <link rel="stylesheet" type="text/css" href="styles.css" /> <title>Realistic Water Ripple Result</championship> </head> <body> <script src="pixi.min.js"></script> <script> var app; function initPixi() { app = new PIXI.Application({width: window.innerWidth, height: window.innerHeight}); document.body.appendChild(app.view); var epitome = new PIXI.Sprite.from("water.jpg"); image.width = window.innerWidth; epitome.height = window.innerHeight; app.stage.addChild(epitome); displacementSprite = new PIXI.Sprite.from("cloud.jpg"); displacementFilter = new PIXI.filters.DisplacementFilter(displacementSprite); displacementSprite.texture.baseTexture.wrapMode = PIXI.WRAP_MODES.REPEAT; app.stage.addChild(displacementSprite); app.phase.filters = [displacementFilter]; app.renderer.view.manner.transform = 'scale(1.02)'; displacementSprite.calibration.ten = 4; displacementSprite.scale.y = 4; breathing(); } function animate() { displacementSprite.10 += 10; displacementSprite.y += iv; requestAnimationFrame(animate); } initPixi(); </script> </body> </html> CSS
body { margin: 0; overflow: subconscious; } Written By
Source: https://redstapler.co/ultra-realistic-water-ripple-effect-javascript-tutorial/
Posted by: knutsonclevestimen.blogspot.com
0 Response to "How To Add Water Animation To Water In Image Javascript"
Post a Comment